

Silicone thermal compound acts as a thermal interface material (TIM). Its main job is to improve heat transfer between a hot component and a cooler. At Trumonytechs, we view this compound as a gap filler, not a standalone cooling system. This guide defines the material, shows where it fits among other options, and explains how to choose it without risking reliability.
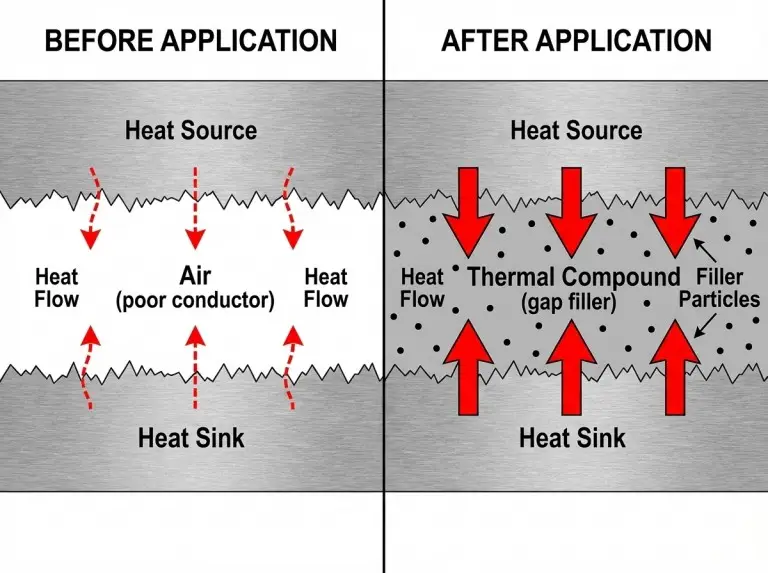
Making a decision is simple when the interface is clear. Even flat-looking surfaces have microscopic roughness that traps air. If two surfaces run hot despite appearing flat, this roughness is often the cause. Silicone thermal compound reduces thermal resistance by filling these gaps, provided the material and application match your assembly.
Definition and Where It Fits in Thermal Interface Materials
Silicone thermal compound is a silicone-based material. It fills tiny voids between two mating surfaces to lower thermal resistance. Manufacturers typically make it from a silicone oil or polymer base loaded with conductive fillers. Most formulations also remain electrically insulating. Depending on its thickness and use, people may call it silicone thermal grease, paste, or joint compound.In many guides, it’s also referred to as thermal paste (sometimes misspelled as “tharmal paste”)
This compound sits between “no TIM” contact and other categories. Thermal pads bridge larger gaps but add thickness. Thermal adhesives bond parts but make rework difficult. Pastes do not have these specific stress issues.
Use silicone thermal compound when three conditions exist:
- The interface has small voids, not large gaps.
- The assembly provides enough pressure to create a thin, stable layer.
- You need better heat transfer without using the TIM for structural support.
How It Works: Filling Micro-Gaps to Reduce Thermal Resistance
This compound improves heat transfer by replacing trapped air with a better conductor. Even smooth metal or ceramic surfaces have micro-roughness. This roughness creates insulating air pockets. The compound flows into these voids. This creates a continuous path for heat to move from the source to the sink.
Performance depends on the bond line, not just the label on the tube. A thick layer can block heat, even if the filler is good. A thin, well-wetted layer works best because heat has less distance to travel.
Do not use the compound to fix poor contact force or warped surfaces. If the heat sink is bent or the gap is wide, the compound may pump out or dry up. In these cases, a thermal pad or different strategy is a better engineering choice.
Main Types of Silicone Thermal Compound
Types differ by viscosity, fillers, and stability. Treat these “types” as application fits rather than quality tiers. The same device might need different compounds depending on mounting pressure or temperature cycles.
General-purpose silicone thermal grease for CPU/GPU heat sinks
We see this type where contact pressure is moderate to high and surfaces are flat. It is common for routine electronics cooling because it spreads easily. It also allows for easy rework. Performance relies heavily on using the right amount and applying even pressure.
High-temperature silicone compounds for power electronics hot spots
Use these when the interface faces high heat or wide thermal cycles. These formulas prioritize stability. They resist separating, evaporating, or thickening over time. Limits vary by product, so always check the datasheet.
Low-bleed / low-migration options for sensitive assemblies
Choose low-bleed options if silicone oil might contaminate nearby parts. This is vital for optical devices or sensors. Cleanliness and material compatibility drive this decision.
Electrically insulating, ceramic-filled compounds for risk-sensitive boards
Engineers choose ceramic-filled compounds when electrical insulation is critical. While many silicone compounds insulate naturally, the filler system matters. Verify the dielectric requirements against your specific assembly conditions.
Where Silicone Thermal Compound Is Commonly Used
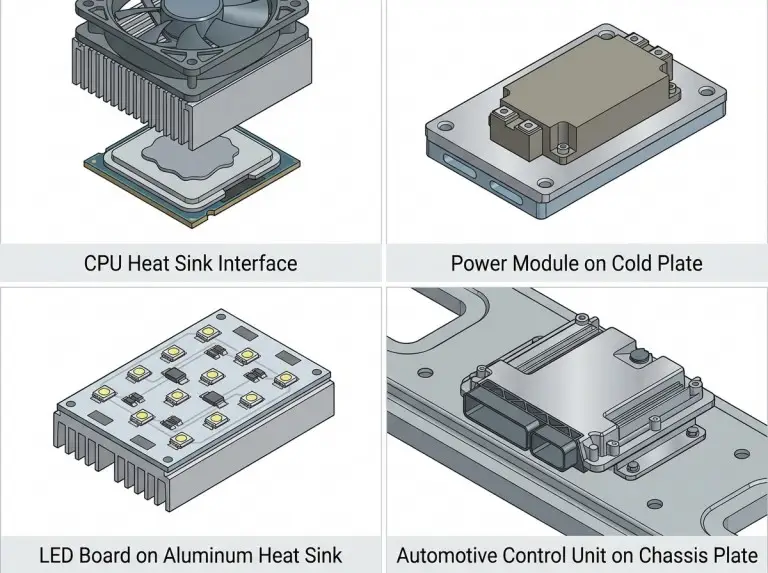
Use this compound wherever a mechanical interface traps air and blocks heat. You typically place it between a heat-generating package and a spreader. The goal is to stabilize temperatures through better conduction, not to increase the capacity of the heat sink itself.
CPUs/GPUs and standard heat sink interfaces
This is the most common use case. The interface usually has strong clamping pressure, allowing for thin bond lines. Correct mounting and spreading determine the results.
Power supplies, regulators, and high-current modules
These interfaces often involve hot spots and long cycles. The compound helps move heat into a chassis or finned sink. Selection focuses on stability under cycling and mechanical constraints.
LEDs and high-power lighting boards
LED modules need a controlled thermal path into a metal board or plate. Use compound here for thin layers and consistent contact. Keep the process clean, as excess material can contaminate nearby features.
Automotive and industrial electronics under cycling and vibration
Vibration challenges bond-line stability. You can use silicone thermal compound here, but it must match the design. If movement is large or pressure varies, a pad may be more robust.
Key Factors for Selection and Safe Use
Base your selection on mechanics, environment, and stability, not just a conductivity number. A product might look good on paper but fail if it pumps out or dries in your specific stack-up. Start by defining gap behavior under load and service conditions.
Verify thermal claims in context. Values change based on test methods and thickness. If your assembly uses low pressure, stability and wetting matter more than peak numbers.
Pay attention to viscosity. Low viscosity risks pump-out during cycling. High viscosity prevents proper wetting and causes voids. Your assembly method dictates what “workable” means.
Treat electrical insulation as a requirement. Some interfaces need it, while others prioritize conduction. Check compatibility with plastics or coatings if contamination is a risk.
Define the operating environment clearly. Temperature, humidity, and vibration affect stability. For harsh environments, verify against datasheets or run specific evaluations.
|
Decision factor |
What to define first |
Why it matters at the interface |
What to verify |
|---|---|---|---|
|
Interface gap + pressure |
Typical clamping force and flatness |
Controls bond-line thickness and void risk |
Wetting and spread under real mounting |
|
Temperature and cycling |
Steady-state + cycle profile |
Drives separation, thickening, or pumping |
Datasheet limits and stability notes |
|
Viscosity/workability |
Assembly method and rework needs |
Affects void formation and repeatability |
Application consistency across operators |
|
Migration/bleed sensitivity |
Nearby parts and contamination risk |
Can affect optics, contacts, or cleanliness |
Low-bleed / low-migration suitability |
|
Electrical requirements |
Need for insulation vs conduction priority |
Prevents shorts and manages risk |
Dielectric behavior in your stack-up |
Correct Application and Common Mistakes to Avoid
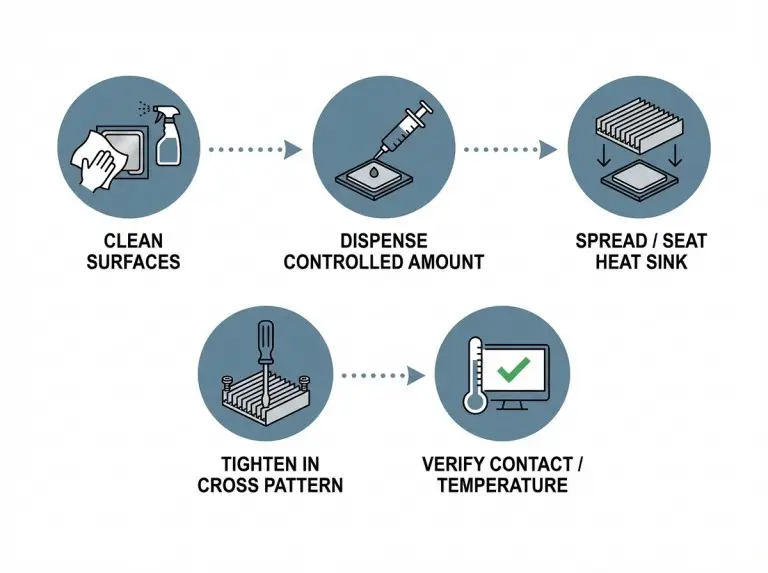
Success comes from a clean interface, controlled amounts, and even pressure. Inconsistent processes trap voids or create thick layers. Focus on repeatable outcomes, not cosmetic perfection.
Application and Troubleshooting Checklist
- Surface prep: Remove dust, debris, and old residue first.
- Fit check: Ensure the gap isn’t too large for paste to bridge.
- Amount control: Measure the amount to avoid squeeze-out.
- Mounting method: Tighten fasteners evenly to prevent tilt.
- Post-assembly check: Look for temperature spikes that indicate voids.
- Rework trigger: If hotspots persist, check flatness and pressure.
Over-application is a common failure. Thick layers block heat and migrate into connectors. Under-application leaves air pockets.
Uneven pressure mimics bad paste. If a corner lifts, hotspots appear. Fixing the mechanics often works better than changing materials.
Frame stability around conditions. Some assemblies last for years; others degrade with cycling. For harsh environments, set inspection criteria rather than assuming it lasts forever.
Conclusion
Silicone thermal compound fills micro-gaps to improve heat transfer. A good result requires matching the compound to your pressure, environment, and stability needs. Apply it with a controlled amount and even mounting. Treat it as an engineered layer—defined and verified—to reduce hotspots without overcomplicating your design.
FAQ
What is silicone thermal compound used for?
It reduces thermal resistance at contact points. It does this by filling micro-voids and replacing trapped air. You typically apply it between a heat source and a sink. For large gaps, use a different material category.
Is silicone thermal compound the same as thermal paste or thermal grease?
Yes, the terms are often used interchangeably. Naming usually reflects viscosity or packaging rather than a strict standard. Choose based on pressure, stability, and your process.
Does silicone thermal compound conduct electricity?
Many are insulating, but it depends on the formula. Verify the dielectric properties against your needs. If the interface is near exposed conductors, require insulation explicitly.
How much silicone thermal compound should I apply?
Aim for a thin, continuous bond line. Too much creates a thick, resistant layer and mess. Too little leaves air pockets.
How long does silicone thermal compound last?
Life depends on the formula and environment. Temperature cycling and vibration shorten it. Define rework triggers based on performance rather than a fixed date.
When should I choose a thermal pad instead of silicone thermal compound?
Use a pad for larger or variable gaps. Pads are also better when pressure is low. Compounds work best for tight, consistent interfaces where rework is frequent.
Facebook
Twitter
LinkedIn
Related posts

0
What are the Different Types of Thermal Pastes?

0
How to Apply Thermal Paste

0
What is Thermal Grease?