

Thermal paste is required when you clamp a CPU or GPU to a heatsink or cold plate. Many performance and reliability issues blamed on “hot chips” actually start at this contact point, not in the fan or radiator. At Trumonytechs, we create thermal management solutions and custom thermal interface materials, including thermal paste. We often see the same failure patterns repeat across different computer builds and repairs.
Working with thermal paste becomes predictable when you treat it as a controlled process. Surface cleanliness, paste quantity, and mounting pressure are the three key variables. They decide whether temperatures stay stable over time. This article explains what thermal paste does in a computer and how to handle it safely.
Thermal paste function at CPU and GPU interfaces
Thermal paste improves heat transfer in computers. It does this by replacing insulating air gaps where the CPU or GPU meets the cooler. The CPU’s heat spreader and the cooler’s base look flat, but they have microscopic textures. This texture prevents full metal-to-metal contact. Thermal paste fills these tiny gaps so more heat can move into the cooler.
Thermal paste belongs between a heat source and a heatsink. It shouldn’t be used just “anywhere heat exists.” In a desktop PC, you most often use thermal paste between the CPU and its cooler. You might also use it on a GPU core when servicing a graphics card. Other computer components often use different interface materials because their gaps and mounting designs are different.
Thermal paste does not create cooling by itself. Fans, fin stacks, vapor chambers, and radiators move heat away from the components. The paste only helps transfer heat into the cooling hardware. It reduces resistance at the contact point so the rest of the cooling system can work properly.

Misconceptions and avoidable errors in thermal paste use
Common thermal paste mistakes in PC builds come from treating thermal paste like glue or applying it like a thick coating. Thermal paste should form a very thin film after the cooler is mounted, and that film should be continuous across the effective contact area. A thick layer usually increases the distance between metal surfaces and can reduce heat transfer.
A second misconception is that “more paste is always safer.” Too much paste increases spill risk around the socket area and creates cleaning problems, and the pressure of the mount may push excess paste outward. Too little paste can leave voids that trap air and create local hot spots, which often looks like temperature spikes under load.
A third misconception is that manual spreading is always the “professional” method. Many guidance sources recommend letting mounting pressure spread the paste because manual spreading can trap air bubbles and can create uneven thickness. Manual spreading can still work in some workflows, but it requires careful technique and should be verified by results rather than habit.
Thermal paste is also not interchangeable with thermal pads. Thermal pads are pre-formed and useful when the mechanical stack-up includes larger gaps or variable tolerances, while paste is better for thin bond lines under clamping pressure. Using paste where a pad is required can leave a gap unfilled, and using a pad where paste is expected can reduce contact quality.

Main types of thermal paste
Main thermal paste types for computers differ most in electrical risk, ease of application, and cooler material compatibility. Type labels vary by vendor, but the practical trade-offs are consistent across PC builds. Lenovo and Corsair both group common options into silicone or carbon-based, ceramic-based, metal-based, and liquid metal categories.
Silicone or carbon-based thermal paste for general PC builds
Silicone or carbon-based thermal paste is commonly used for mainstream desktops and for users who prioritize handling safety. These pastes tend to be easy to apply and clean, and many stock coolers ship with a pre-applied compound in this category. They are often the “default” choice when the goal is stable operation with minimal spill risk.
Carbon-based formulations are often selected when users want a balance between usability and performance without adding electrical risk. Real-world results still depend on contact pressure, surface condition, and the cooler’s capability. For most systems, that mechanical setup matters more than small paste differences.
Ceramic-based thermal paste for electrical safety margin
Ceramic-based thermal paste is widely used when electrical non-conductivity is a priority. Ceramic fillers can provide good thermal conduction while keeping electrical risk low if paste spreads outside the target area. This makes ceramic options a common fit for first-time builders and for frequent service workflows.
Ceramic paste still requires controlled application. Excess paste can still squeeze out, collect dust, and complicate future maintenance. The correct objective remains a thin, void-free interface film after mounting.
Metal-based thermal paste for higher-risk handling
Metal-based thermal paste typically targets lower interface resistance but increases handling risk. Some metal-filled pastes can be electrically conductive or capacitive, which raises the consequence of spills near exposed contacts. This category is better suited to users who can control cleanliness and who can verify that the paste stays confined to the intended interface.
Metal-based paste decisions should also consider service frequency. If a system is opened often, the cumulative spill and cleaning risk rises. In many PC workflows, a safer paste plus good mounting control is the more robust choice.
Liquid metal for advanced use cases with strict compatibility rules
Liquid metal is an electrically conductive alloy used as a thermal interface, not a conventional paste. Liquid metal can damage aluminum because gallium-based alloys can react with aluminum surfaces, so compatibility with heatsink materials must be confirmed before use. Corsair specifically flags liquid metal as unsuitable for all coolers and as a risk to aluminum heatsinks.
Liquid metal also raises process-control requirements. A single stray droplet can short electronics, and cleanup is more complex than standard paste. For most computer users, liquid metal is unnecessary unless a specific advanced workflow justifies the added risk.
|
Thermal interface type |
Electrical spill risk |
Typical use in computers |
Key compatibility constraint |
|---|---|---|---|
|
Silicone or carbon-based paste |
Low |
General CPU coolers, many pre-applied stock/AIO bases |
Verify cooler has no pre-applied paste before adding |
|
Ceramic-based paste |
Low |
Builder-friendly CPU repaste, frequent service |
Still needs thin bond line and clean surfaces |
|
Metal-based paste |
Medium to high |
Controlled builds where spill risk is managed |
Treat as higher-consequence if it reaches contacts |
|
Liquid metal |
High |
Advanced users with strict process control |
Avoid aluminum; confirm material compatibility |
How to choose thermal paste for a computer build or service
Choosing thermal paste should be based on electrical safety, contact pressure, and maintenance needs. Many buyers focus too much on marketing claims. They often ignore the assembly conditions that actually control the outcome. A paste that is easy to apply consistently often performs better in real builds because it reduces the risk of voids.
Electrical risk is the first factor. If a spilled paste could cause a short, your build process must prevent spills and ensure cleanliness. If your work includes frequent cooler removal or GPU servicing, a non-conductive paste usually lowers long-term risk.
Mechanical fit is the second factor. Mounting pressure and cooler base flatness determine if the paste forms a thin, continuous film. If the mounting hardware is uneven or the cooler shifts during tightening, even a good paste can create poor contact.
Maintenance expectations are the third factor. Some compounds have a curing period, while others may degrade faster with repeated heat cycles. The practical choice depends on how often you plan to open the system and how stable you need the temperatures to be. Lenovo notes that paste degradation happens over time, so your selection should include a plan to verify temperatures rather than just making assumptions.
Selection checklist for PC thermal paste
- Prefer electrically non-conductive paste unless you have strong process controls.
- Match your paste choice to service frequency and the consequences of a spill.
- Verify cooler material compatibility before you consider liquid metal.
- Treat mounting pressure and flat contact as the primary drivers of performance.
- Plan a temperature check after installation to validate the interface.
Applying thermal paste and verifying results
Successful thermal paste application happens when the cooler’s mounting pressure spreads a small, centered dot into a thin, continuous film. The goal is complete coverage without overflow. The method should match the CPU’s shape and the cooler’s contact design. Intel and Corsair both suggest placing a small amount in the center and letting the mounting pressure do the spreading.
Surface preparation prevents most “mystery temperature” problems. Old paste residue, skin oils, or lint can stop the paste from spreading evenly, which increases the risk of voids. Clean both the CPU heat spreader and the cooler base with isopropyl alcohol and a lint-free cloth. Then, let the surfaces dry completely.
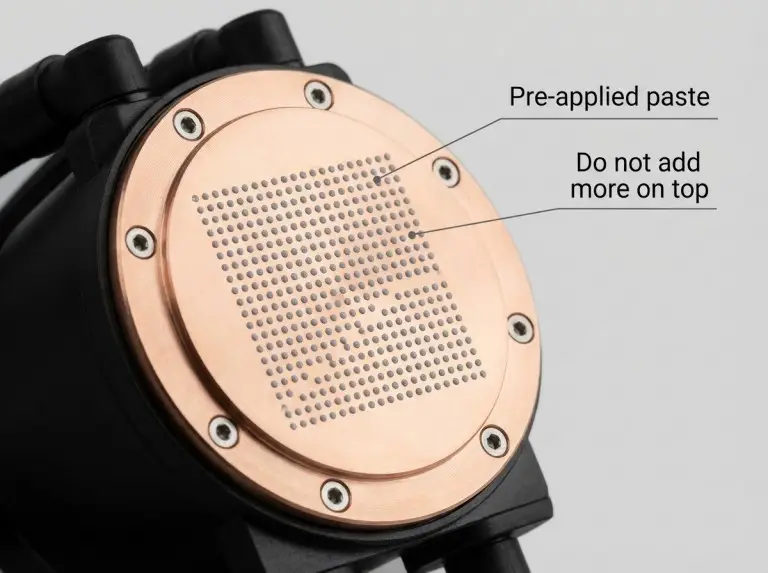
Pre-applied paste changes the process. Many CPU coolers and AIO cold plates come with paste already on them. Adding more paste can increase the layer’s thickness and the risk of spills. Intel recommends checking the cooler base for pre-applied paste and skipping the paste step if it is there.
The right amount of paste is “just enough to spread under pressure,” not a fixed volume. A pea-sized dot is a common starting point. Some rectangular CPUs may benefit from a thin line or several small dots to improve initial coverage.
The mounting method is a variable you can control and check. Place the cooler straight down with light pressure. Then, tighten the screws in a diagonal pattern to apply pressure evenly. Intel recommends an “X” style tightening sequence and warns against moving the cooler after the paste makes contact.
The rules for re-seating the cooler are important. If you install the cooler and then remove it, the paste film can trap air pockets and become uneven. Intel and Lenovo both advise cleaning off the paste and reapplying a fresh layer after removal.
Application verification checklist
- Confirm if the cooler has pre-applied paste before you add any.
- Verify both surfaces are clean, dry, and free of lint.
- Tighten the mount diagonally to apply even pressure across the CPU.
- After installation, check for any paste that has squeezed out around the CPU.
- Validate temperatures under a consistent workload.
Conclusion
A good thermal paste workflow for computers lowers temperature risk. It involves controlling surface cleanliness, paste quantity, and mounting pressure. Thermal paste has one job: to replace insulating air gaps at the CPU or GPU contact point so the cooler can remove heat. When you check for pre-applied paste, use a diagonal mounting pattern, and reapply paste after re-seating, your results become more reliable.
At Trumonytechs, we see thermal interface choices as part of a whole system. This system includes the heat source, the clamp load, and the service plan. If you are building a new PC, fixing unstable temperatures, or choosing a thermal interface for production, we suggest documenting your process. You should also verify the results with a consistent test load. This approach grounds your decisions in measurable facts instead of assumptions.
FAQ
What is thermal paste for computers used for?
Thermal paste helps improve heat transfer between a CPU or GPU and its heatsink. It fills tiny air gaps that would otherwise insulate the two surfaces. Better contact helps maintain stable temperatures and reduces the risk of thermal throttling.
Do I need thermal paste if my cooler already has it?
If your cooler has pre-applied paste, you usually should not add more. Check the cooler base, and if paste is there, mount the cooler as instructed. Adding extra paste can create a thicker layer and increase spill risk.
Can I use thermal pads instead of thermal paste on a CPU?
You can use thermal pads as an alternative, but performance depends on the pad’s thickness and mounting pressure. Pads are common when a design needs to bridge a larger gap. Lenovo notes that pads may be easier to install but may not match the performance of high-quality paste in some situations.
Should I spread thermal paste or let the cooler spread it?
Letting the cooler’s pressure spread the paste is the safer option for most PC builds. Intel recommends this method because spreading it by hand can trap air bubbles and create an uneven layer. Manual spreading can still work if done carefully but should be chosen for specific workflow reasons.
Can I reuse thermal paste after removing the cooler?
Reusing thermal paste is generally a short-term fix, not a best practice. Intel and Lenovo both warn that reuse can trap air and lower the contact quality. The reliable approach is to clean the surfaces and reapply a fresh layer.
When should I reapply thermal paste on a computer?
You should reapply thermal paste when temperatures rise without a clear reason, when a cooler is removed, or after long-term use. Lenovo notes that compounds degrade over time and recommends replacement when temperatures increase or during maintenance. The best trigger is monitoring your system’s temperatures, as the exact interval depends on many factors.