

A correct liquid cold plate install gives stable contact. It provides stable flow. It offers repeatable temperatures under real load. This guide covers practical steps to achieve that.In some documentation, the same component may also be labeled a cold hot plate—the installation rules in this checklist still apply. It targets EV/ESS battery thermal management and high-power electronics.
At Trumonytechs, we design custom liquid cold plates. We make them for heavy thermal loads. We see common failures. These include poor surface prep and wrong fittings. They also include hidden tube stress and incomplete bleeding. We guide you through a workflow. It stops these issues. It prevents leaks, hot spots, or warranty returns.
what a “correct install” looks like
A correct install passes simple checks. These include no leaks. They include stable pump behavior. They include stable flow and pressure. They include temperatures that match your thermal goals. This section explains those checks. Every later step aims at them.
You do not need advanced simulation to check install quality. But you need baseline measurements. Record torque settings or methods. Note coolant type and flow rate. Track inlet and outlet temperatures. This makes troubleshooting fast and clear.
A good install protects hardware. Fittings match and seal right. Tubes avoid twists or over-bends. The cold plate stays flat from even clamping. If you break these rules, thermal performance starts fine. But it drops later.
Pre-install checklist
Check interfaces and limits before you start. This avoids rework. Do it before you open a tube or apply TIM. This checklist fits cold plates in battery packs and power electronics. It suits compact setups where access shrinks after mounting.
Your goal is clear. Confirm the cold plate mounts well. Ensure it connects to the hydraulic system. Make sure it shares a loop safely with other materials. If any point fails, stop. Fix it before you install.
| Check item | What “pass” looks like | If it fails, what to do |
|---|---|---|
| Port & thread match | Thread standard matches (e.g., NPT vs BSPP vs SAE/ORB), and sealing method matches (O-ring seat, gasket, or thread sealant rule) | Re-spec fittings; never “force” mismatched threads |
| Flow direction & orientation | Inlet/outlet are confirmed, and the plate is oriented as intended in the assembly | Re-label ports; verify manifold routing before torque-down |
| Material compatibility | Plate material, fittings, manifold, and loop materials are compatible with the coolant and inhibitors | Add proper inhibitor package or redesign mixed-metal contact points |
| Clearance & service access | You can access fasteners and fittings for re-torque and inspection after assembly | Adjust layout; add service windows or reposition lines |
| Tube bend radius & strain | Routing meets bend radius, with strain relief and clamps where needed | Re-route and add support; avoid tension into the plate ports |
| Sensor & control plan | Temperature and flow/pressure measurement points are defined | Add ports/sensors now, not after the pack is closed |

Hardware & consumables
Use set tools and supplies for repeatable installs. Avoid relying on feel. This section lists a basic kit. It keeps work consistent across builds and workers.
Use a torque driver or wrench. Match it to your fastener size and torque range. If the drawing lacks a torque spec, ask for it. Contact your cold plate supplier or fastener standard owner. Get the right value and clamping method.
Plan your TIM as a key factor. TIM type affects contact resistance. So does thickness behavior. Application method matters too. This holds true with uneven surfaces or large areas.
Handle coolant work with care. It poses electrical risks. It also risks contamination. Use ESD steps around boards and connectors. Control spills. A small leak can cause big failures.

Cold plate mounting
Mount the cold plate well. Control surface condition. Manage interface material. Spread clamping pressure even. This sequence works with tight tolerances. It fits limited access.
Surface prep and flatness
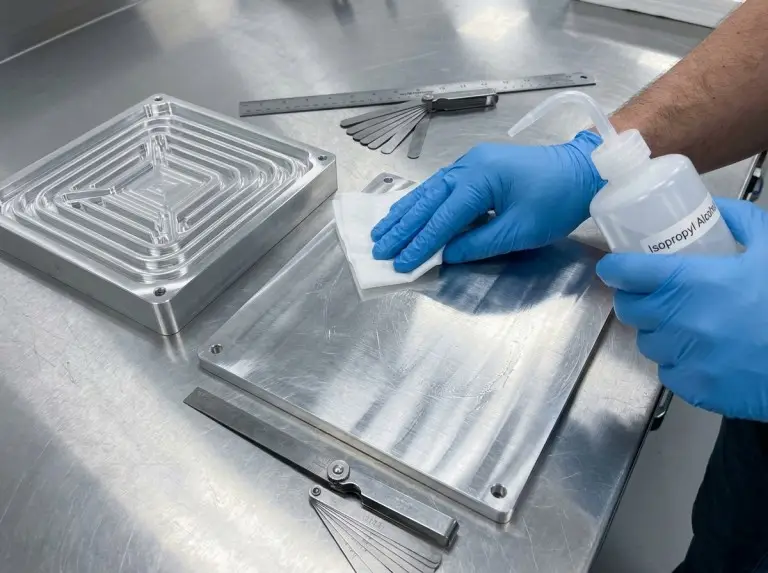
Clean contact surfaces first. Make them dry. Remove burrs or raised dirt. Use a lint-free wipe. Pick a solvent that fits your materials. Keep fingerprints off contact faces.
Fix surface mismatch before TIM. A thick TIM hides flatness issues short-term. But it raises thermal resistance. It causes long-term pump-down.
TIM selection and application
Pick a TIM that fits your setup. Match it to service environment and temperature range. Consider service needs. For large interfaces, use controlled-thickness pads. Or try dispensable gap fillers. They repeat better than hand-applied paste. The best choice depends on compression limits. It also depends on electrical isolation needs.
Apply TIM to remove voids. Avoid a thick insulating layer. Follow your TIM supplier’s pattern. Keep the process the same across units.
Alignment and orientation
Align the plate with mounting holes first. Check inlet/outlet orientation. Match it to your routing plan. Treat orientation marks as key features.
Stop hoses from pulling the plate out of line. Fix routing if it creates side load. Do not hold it with bolts.
Torque pattern and tightening method
Tighten in a cross pattern. Use a diagonal sequence. This spreads pressure even. Tighten in stages. Make three passes. Avoid full torque on the first pass.
Re-check torque after the final pass if allowed. For compressible TIMs, re-check after a short wait. This cuts long-term relaxation.
Plumbing & strain control
Leaks often come from plumbing choices. So do thermal issues. These do not stem from the cold plate core. This section covers fitting fit. It stresses sealing rules. It calls for routing without stress on the plate.
Fittings: Thread match alone fails. Match the sealing type. A straight thread seals on an O-ring face. A tapered thread seals with deformation and sealant.Avoid mixing sealing types. Confirm port design. Check for O-ring boss or gasket face. Or look for tapered thread. Use drawings or supplier advice.
Routing:Cut tubing to fit. Route it without stretch or forced bends. A tube may look fine at rest. But it loads the fitting under vibration or heat expansion.Use clamps and strain relief. Let structure handle forces. Keep them off cold plate ports. Position quick-disconnects for easy service. Avoid twists downstream.
Re-check before you fill: Re-check mechanics after connections. Ensure fittings seat full. O-rings stay un-pinched. Tubes avoid sharp edges. Nothing pulls sideways on ports. This prevents leaks at low cost.
Confirm manifolds if used. Avoid flow reversal or dead legs. Bad manifold routing mimics poor cold plate work. But it stems from distribution.
Commissioning: fill, bleed, first run, and acceptance checks
Commissioning turns a good build into a stable system. Fill without air traps. Bleed without pump cavitation. Check operation before full power.
Fill and prime in a controlled way
Fill from the reservoir or fill point. Follow your loop design. Prime the pump to avoid dry runs. Dry runs damage seals fast. They add debris to the loop.
Start at low speed or pulse if possible. This moves air to bleed points. Full speed turns air into foam. It makes bleeding hard.
Bleed air until behavior is stable
Air hides in high points and narrow channels. It lingers at pump inlets. Bleeding ends when flow stabilizes. Noise quiets. Temperature response predicts well.
Watch for microbubbles. Look for flow changes. Hear rattling pump noise. See wandering temperatures. Fix with new orientation or bleed steps. Do not blame the plate.
First run and quick acceptance
Start with low thermal load. Check pump control. Ensure pressure and flow stay stable. Raise load step by step. Watch temperature trends.
Reject systems that need shakes to work. Or those that run at one speed only. These signal trapped air or bad routing.
| Observation | Most likely cause | Fastest action |
|---|---|---|
| Visible moisture at fitting | Seal mismatch, O-ring damage, under/over-tightening | Depressurize, inspect sealing surfaces, replace seal, reinstall correctly |
| Stable flow but high temperatures everywhere | Insufficient heat rejection, wrong coolant condition, flow below design | Confirm radiator/HEX performance, verify coolant mix, verify flow against spec |
| Local hot spot near one device | Poor contact/TIM void, uneven clamp, warped surface | Check torque pattern, inspect interface, reapply TIM with controlled method |
| Flow fluctuates; pump noisy | Air ingestion, poor priming, cavitation at pump inlet | Re-bleed, improve inlet head, reduce restrictions, adjust reservoir level |
| High pressure drop vs expectation | Kinked tube, blocked filter, wrong fitting ID, debris | Inspect routing, check filters, flush loop, verify fitting internal diameter |
Troubleshooting & routine checks: fast diagnosis without guessing
Start troubleshooting with few measurements. Use high-confidence ones. Measure flow. Track inlet/outlet temperatures. Add pressure drop if possible. This isolates issues fast.
Separate thermal problems from hydraulic problems
Fix unstable flow first. Or abnormal pressure drop. Tackle the hydraulic side. A cold plate fails if coolant moves wrong.
Check interface quality if flow stays stable but hot spots linger. Look at clamp evenness. Often the cold plate works fine. But heat enters poorly.
Use trends, not single numbers
Single readings mislead. Sensors may sit wrong. Response time may lag. Watch trends under step loads. Stable systems ramp smooth. Deltas stay consistent.
Probe big delta changes at same flow and load. Check contact or sensor placement. Or flow distribution. Investigate mount and manifold.
Routine checks that prevent surprises
Inspect often to catch failures early. Check for leaks visually. Monitor coolant levels. Spot small issues before corrosion or electrical problems grow.
Watch coolant for discoloration or residue. Note unusual odors. These signal corrosion or growth in water loops. Or material mismatch.
Conclusion
Build a reliable install on three controls. Use clean flat contact surfaces. Apply repeatable TIM. Clamp even and verified. Seal plumbing right. Avoid port stress. Commission with care. Fill and bleed. Validate with baseline measurements. This stops common leaks and hot spots.
At Trumonytechs, we help customers. We offer custom liquid cold plates. We give integration guidance for EV/ESS and high-power electronics loops. Share your mounting limits. Note port standards. Give coolant choice. Set acceptance targets like flow, ΔP, and temperature limits. We align the design and procedure. Your first build matches the tenth.
FAQ
What is the single most important step in cold plate installation?
Control the interface between heat source and cold plate. This step matters most. Poor contact makes hot spots. No pump fixes them. Use clean surfaces. Apply TIM in a set way. Tighten with a cross pattern. Verify contact pressure. You need this for trust.
How do I choose the right fittings and avoid leaks?
Match the sealing method. Do not match thread type only. Confirm port seals with O-ring or gasket face. Or tapered-thread seal. Build the joint to fit. Use cold plate drawing if unsure. Or check supplier docs.
What should I do if temperatures are high even though the pump is running?
Confirm flow first. Purge air fully. An aerated loop seems to run. But it moves little coolant. If flow stays stable, check heat rejection. Look at radiator or HEX. Then inspect mounting interface. Check for TIM voids or uneven clamping. High temperatures often hit the system. Not the cold plate core.
How do I know bleeding is truly complete?
Bleeding ends when pump noise quiets. Flow stops changing. Temperature responds consistent under step loads. Fix microbubble signs with new orientation. Or change bleeding method. Keep going. Tapping the tube to make it work means you must continue.
Can I mix aluminum and copper parts in the same cooling loop?
You can mix them. But manage galvanic risk. Use right coolant chemistry. Add corrosion inhibitors. Uncontrolled mixes cause corrosion products. They block passages. Performance drops long-term. Treat coolant choice as key. Maintain it well. Do not add it last.
When should I rework a cold plate installation instead of continuing to troubleshoot?
Rework if evidence shows mechanical fault. Or interface fault. Look for persistent hot spots. See leak traces. Note stressed fittings or tubes. Tuning the pump rarely fixes uneven mounts. Or seal mismatch. Rework early. It costs less than marginal runs.